
Classic Homemade Orange Candy

Bright, tender slices of orange preserved in a simple syrup until translucent — a nostalgic, elegant sweet that’s perfect rolled in sugar or dipped in chocolate.

This classic homemade orange candy is one of those tiny rituals that turns a simple piece of fruit into something celebratory. I first learned this method from my grandmother, who kept a jar of translucent orange rounds on the counter during winter holidays. The process is straightforward — thinly sliced oranges are simmered slowly in a clear sugar syrup until the peel and flesh become jewel-like and tender — but the result is unexpectedly luxurious: sweet and slightly tangy, with a delicate chew and a bright citrus aroma that fills the kitchen.
I discovered my own tweaks while preserving a basket of late-season tangelos. I started slicing very thin with a mandoline and extended the simmer time a little to let the syrup penetrate fully. When I finished a batch and offered the first slice to my neighbor, she closed her eyes and said the flavor transported her back to childhood. These candies are special because they’re simple pantry alchemy — sugar, water, and fruit — yet they present beautifully and store well. They make thoughtful gifts tucked into small boxes, they add a sophisticated note to desserts, and they are wonderfully snackable straight from the jar.
Why You'll Love This Recipe
- Bright, concentrated citrus flavor: slow simmering turns ordinary oranges into jewel-like slices with an intense, sweet-tart profile that’s irresistible.
- Simple pantry ingredients: you only need oranges, granulated sugar, and water, so it’s an easy project even on short notice.
- Flexible finishing options: leave them plain, roll in sugar for a frosted look, or dip in chocolate and sprinkle with flaky salt for a grown-up treat.
- Make-ahead friendly: candies store well at room temperature or in the fridge and make elegant edible gifts that keep for weeks.
- Perfect for small batches: the recipe yields about 18–20 slices from 3 small oranges or tangelos, ideal for tasting or sharing at gatherings.
- Minimal active time: about 20 minutes of hands-on prep and an hour of gentle simmering — mostly hands-off once the slices are in the syrup.
When I first made a batch for a neighborhood potluck, I tucked a few slices into a small tin as favors. Guests loved the balance of sweet syrup and citrus oil — the peel’s gentle bitterness plays beautifully with sugar. Over the years I’ve learned to be patient with the simmer; turning the slices occasionally ensures even translucency and prevents tearing. It’s become a ritual: music on, knives sharpened, and a quiet hour watching oranges turn into candy.
Ingredients
- 3 small oranges or tangelos (about 18–20 slices): Choose thin-skinned, firm fruit with a bright aroma. Navel, Valencia, or tangelos work well; look for oranges that feel heavy for their size — that means they’re juicy. I often buy organic when possible to avoid wax on the peel; if you use conventionally grown fruit, scrub the skins well and peel thinly where necessary.
- 3 cups granulated sugar: Regular white sugar gives the cleanest, glassy finish. Avoid substitutes like brown sugar which will darken the syrup and change the flavor. If you prefer a slightly lighter finish, superfine sugar dissolves faster, but standard granulated is perfectly fine.
- 3 cups water: Use filtered water if your tap water has a strong taste. The syrup should be clear and neutral so the orange flavor is the star.
- Optional coatings: Extra granulated sugar for dusting, or 4–6 ounces melted dark chocolate for dipping. A pinch of flaky sea salt adds a lovely contrast if you dip in chocolate.
Instructions
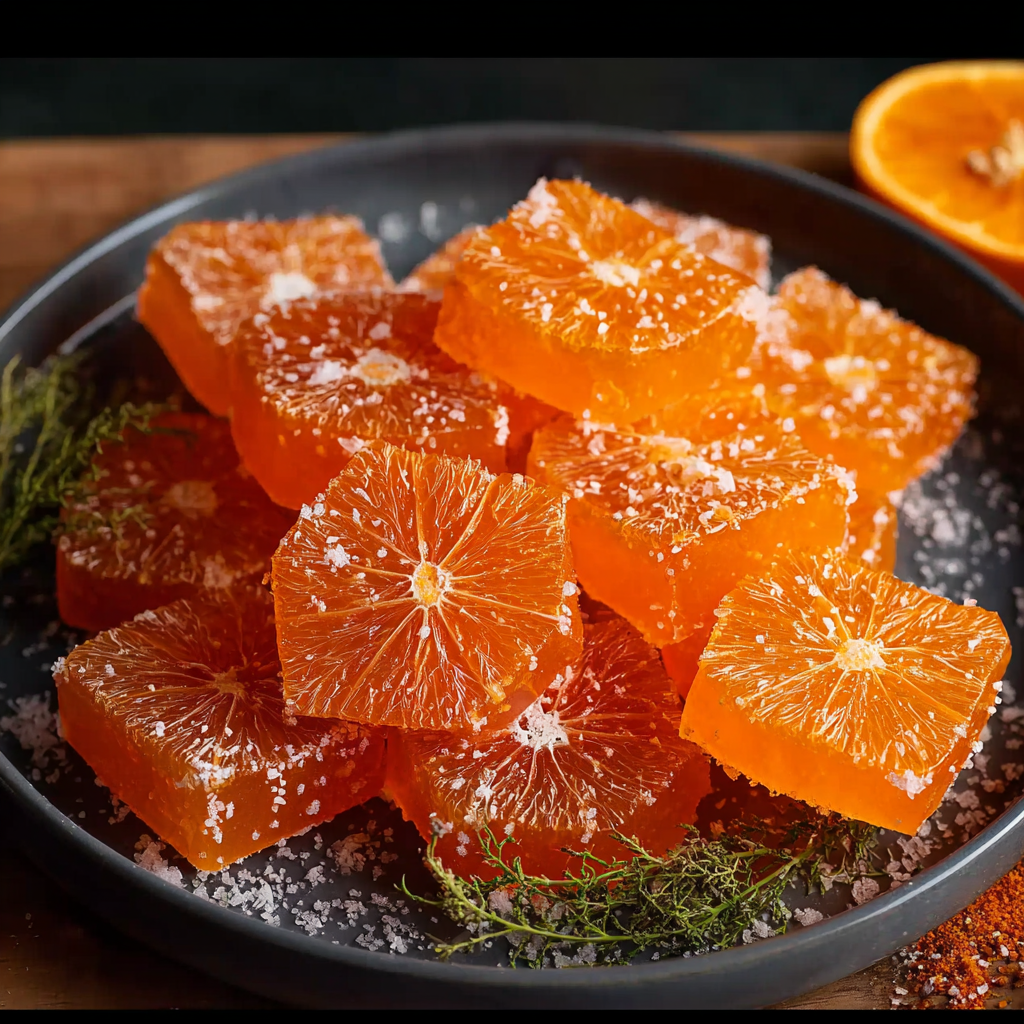
Step 1 — Slice the oranges: Rinse the fruit and dry thoroughly. Using a sharp chef’s knife or a mandoline, cut into 1/4-inch (about 6 mm) rounds. Aim for uniform thickness so the slices poach evenly; thinner slices turn translucent faster but are more fragile. If any seeds appear, remove them carefully so they don’t cloud the syrup during cooking. Arrange the slices flat on a plate as you work. Step 2 — Make the simple syrup: In a medium saucepan, combine 3 cups sugar and 3 cups water. Stir over medium heat until the sugar dissolves and the mixture comes to a gentle boil. Once boiling, reduce heat so the syrup is at a very gentle simmer — you want small steady bubbles, not a roaring boil. A rolling boil will agitate the slices and make them tear. Step 3 — Poach the slices: Gently add the orange rounds to the syrup in a single layer. If they overlap, rearrange them with tongs; overlapping will prevent even cooking. Maintain a low simmer and cook for 45–60 minutes, turning the slices occasionally with tongs so both sides become translucent. The edges should look clear and glassy and the flesh should feel tender when pressed lightly. Watch the syrup level and add a tablespoon or two of hot water if it reduces too fast. Step 4 — Dry the slices: Using tongs or a slotted spoon, transfer the cooked slices to a wire rack set over a sheet pan to catch drips. Separate any sticking pieces gently. Leave uncovered at room temperature to dry for 24–48 hours, depending on humidity, until the surfaces are tacky but set. A drier climate will require less time; in humid weather allow the full 48 hours or use a cool oven (turned off) with the door ajar to accelerate drying slightly. Step 5 — Finish and store: When tacky and set, you can leave the slices plain, roll them in granulated sugar for a frosted look, or dip one edge in melted dark chocolate and sprinkle with flaky sea salt. Store stacked in a single layer or separated with parchment paper in an airtight container at room temperature for up to 2 weeks, or refrigerate to extend shelf life.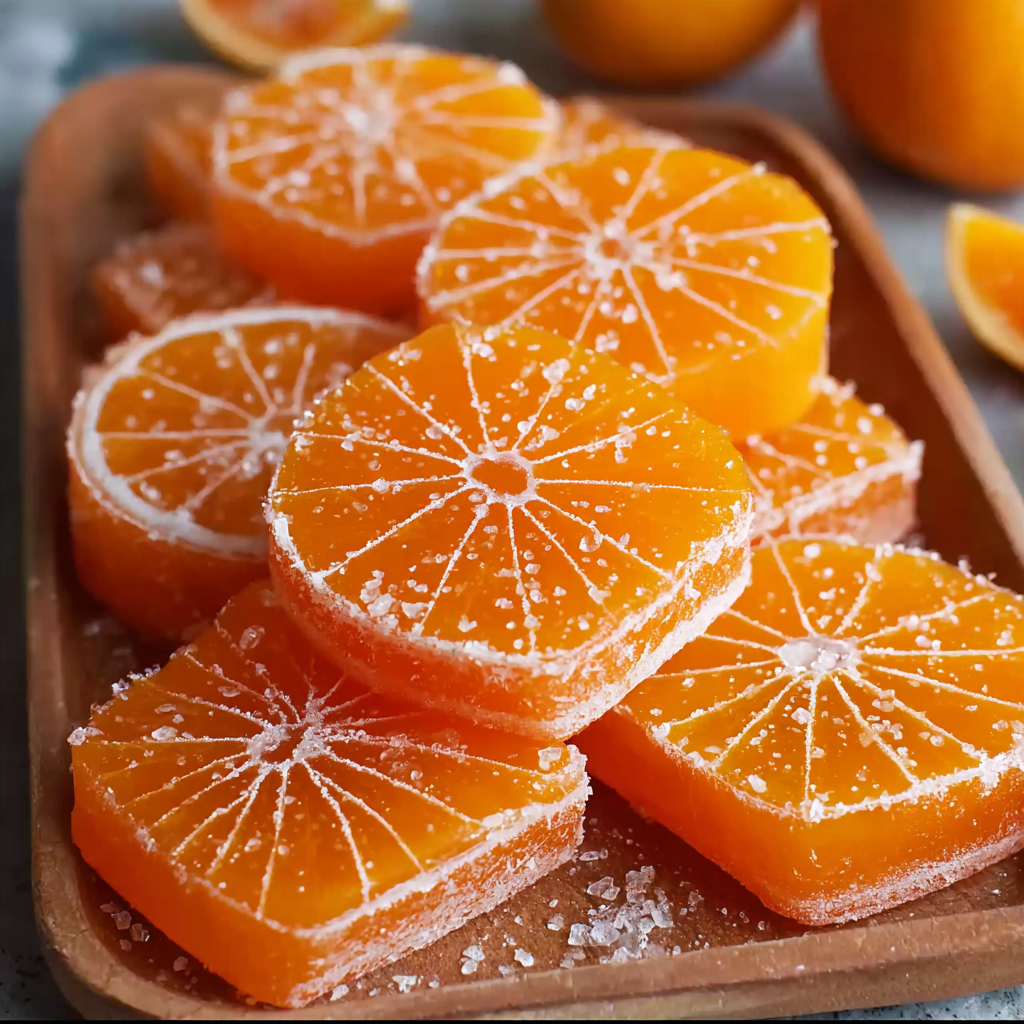
You Must Know
- These candies are high in sugar: each slice contains concentrated carbohydrates from the syrup — store and portion accordingly.
- Drying time varies: allow 24–48 hours depending on humidity; don’t rush or the centers may remain tacky and syrupy.
- They freeze well: layer between parchment and freeze in a sealed container for up to 3 months; thaw at room temperature before serving.
- Use firm, thin-skinned oranges for best results: thick or overly ripe fruit will break apart during simmering and yield less attractive pieces.
- Leftover syrup is flavored and useful: reserve the syrup to sweeten cocktails, iced tea, or to poach pears.
My favorite thing about these candied rounds is how versatile they are — a handful on a dessert plate transforms a simple scoop of ice cream, and a few draped over a holiday cake make an elegant garnish. I once wrapped a small stack as a thank-you gift after a dinner party; the host used them to decorate a lemon tart and called it ‘the final flourish’. The way the syrup concentrates the orange oils always surprises guests and becomes a conversation starter at gatherings.
Storage Tips
Store the finished slices in a single layer or separated with parchment paper in an airtight container. At room temperature they keep well for up to two weeks in a cool, dry place away from direct sunlight. To extend shelf life store in the refrigerator for up to one month, but note that refrigeration can make the texture firmer — bring to room temperature before serving to restore tenderness. For long-term storage, freeze flat between sheets of parchment in a sealed container for up to three months; thaw on the counter and pat away any surface moisture with a paper towel.
Ingredient Substitutions
If you don’t have small oranges or tangelos, use blood oranges, mandarins, or clementines — adjust cooking time if the slices are thinner. For a lighter-sweet finish, replace up to 1 cup of granulated sugar with superfine sugar which dissolves faster; avoid using honey or maple syrup as their flavor and color will change the appearance. If you prefer a lower-sugar version, reduce sugar by 25% but understand the texture and shelf stability will change and the slices may be less glossy.
Serving Suggestions
Serve plain as a bright palate cleanser with tea, or roll in sugar and arrange on a cheese board alongside soft cheeses like ricotta or mascarpone. Dip half in melted dark chocolate and sprinkle with flaky sea salt for a refined treat that pairs beautifully with espresso or a dessert wine. For a festive touch, thread several slices on a skewer and surround with nuts for a simple cocktail garnish or use as a decorative topper on bundt cakes and pavlovas.
Cultural Background
Candied citrus has a long history in Mediterranean and Middle Eastern cuisine where preserving fruit in sugar or honey was a way to enjoy seasonal produce year-round. In Europe, candied peels and slices became associated with holiday baking and confectionery; Italian panettone and French fruitcakes often feature preserved citrus. The technique in this version — gently poaching thin rounds in a clear syrup until translucent — emphasizes the fruit’s natural flavor rather than heavy spicing, creating a simple, elegant confection that’s both traditional and modern.
Seasonal Adaptations
In winter, use blood oranges and add a cinnamon stick to the simmering syrup for a warm note; remove the stick before adding slices. In spring or summer, try Meyer lemons for a floral brightness and shorten simmering time for thinner skins. For autumnal variations, poach in a light spiced syrup with star anise and clove then finish with a dusting of crystallized ginger. These small shifts transform the same technique to match seasonal menus and pairings.
Meal Prep Tips
Make slices ahead of time and store them in a sealed jar at room temperature for gifts or plated desserts. Reserve the flavored syrup in a sterilized jar in the fridge for up to two weeks and use it to sweeten cocktails, iced tea, or drizzle over pancakes. When making a larger batch, stagger the slices on multiple wire racks so air circulates freely. If preparing for a party, candy the fruit two days before serving so they reach the perfect tacky texture on the day.
At the end of a quiet afternoon in the kitchen, I love arranging a few translucent slices on a small plate with a spoon of dark chocolate for dipping — it’s a simple, elegant pleasure. Share them, gift them, or keep them all to yourself: they’re one of those small, handmade luxuries that make any day feel a touch more festive.
Pro Tips
Use a sharp knife or mandoline to slice oranges uniformly about 1/4 inch thick for even cooking.
Keep the syrup at a gentle simmer — a vigorous boil will tear the slices and cloud the liquid.
Dry slices on a wire rack at room temperature for 24–48 hours; humidity lengthens drying time.
Save leftover syrup to flavor drinks, cocktails, or to poach other fruits.
If dipping in chocolate, chill the slices briefly so the chocolate sets quickly and cleanly.
This nourishing classic homemade orange candy recipe is sure to be a staple in your kitchen. Enjoy every moist, high protein slice — it is perfect for breakfast or as a wholesome snack any time.
Tags
Classic Homemade Orange Candy
This Classic Homemade Orange Candy recipe makes perfectly juicy, tender, and flavorful steak every time! Serve with potatoes and a side salad for an unforgettable dinner in under 30 minutes.
Instructions
Slice the fruit
Rinse and dry the oranges. Using a sharp knife or mandoline, slice into uniform 1/4-inch rounds. Remove any seeds gently so they don’t cloud the syrup.
Make the syrup
Combine 3 cups sugar and 3 cups water in a saucepan. Stir over medium heat until sugar dissolves and the mixture comes to a gentle boil, then reduce to a low simmer.
Poach the slices
Add the orange rounds in a single layer. Simmer gently for 45–60 minutes, turning occasionally, until the peel and flesh become translucent and tender.
Dry the slices
Remove slices with tongs to a wire rack over a sheet pan and dry uncovered at room temperature for 24–48 hours until tacky but set.
Finish and store
Roll in sugar or dip in melted chocolate if desired. Store in an airtight container at room temperature for up to 2 weeks or refrigerate to extend shelf life.
Last Step: Please leave a rating and comment letting us know how you liked this recipe! This helps our business to thrive and continue providing free, high-quality recipes for you.
Nutrition
Did You Make This?
Leave a comment & rating below or tag
@cozycookscorner on social media!
Categories:
You might also like...
Air-Fried Pizza Rolls
Golden, crispy pizza rolls made in the air fryer — a quick, family-friendly snack with melty cheese, pepperoni, and a marinara dip.

Air-Fried Rice Paper Noodle Rolls
Light, crisp rice paper rolls filled with vermicelli, veggies and tofu or shrimp, finished in the air fryer for a healthy, crunchy snack.
Air Fryer Apple Fries
Crispy, cinnamon-sugar coated apple sticks air-fried to golden perfection — a quick, family-friendly snack that tastes like fall in every bite.
Did You Make This?
Leave a comment & rating below or tag @cozycookscorner on social media!
Rate This Recipe
Share This Recipe
Enjoyed this recipe? Share it with friends and family, and don't forget to leave a review!
Comments (1)
This recipe looks amazing! Can't wait to try it.
Comments are stored locally in your browser. Server comments are displayed alongside your local comments.

Hi, I'm Lina!
What's Popular

30-Minute Meals!
Join to receive our email series which contains a round-up of some of our quick and easy family favorite recipes.